Quick Fixes for Winter Bulb Blooms
Short answer: Your winter bulbs might not be blooming due to incorrect planting depth, poor bulb quality, insufficient chilling period, or planting them too late. Many bulbs need a specific number of weeks below a certain temperature to trigger flowering. For bulbs planted outdoors, ensure they are in well-draining soil and received adequate moisture during their dormancy. Forcing bulbs indoors requires specific timing and avoiding excessive heat or light. Always use healthy, firm bulbs and plant them at the correct depth, typically 2-3 times the bulb’s height. Some varieties also need division every few years to maintain vigor. Check the specific needs of your chosen winter bulbs for best results.
So, you’re dreaming of a garden that still has some color when everything else is asleep. You want those cheerful winter bulbs to pop up and say hello. I totally get that feeling! It’s frustrating when you plant them and then… nothing. This guide is here to help you figure out why your winter bulbs aren’t blooming. We’ll cover the common pitfalls and give you actionable steps. This isn’t about fancy botany; it’s about practical backyard gardening, drawing on solid advice from places like university extensions (houseplant care).
We’ll explore how to select the right varieties, the best times to plant them, and what conditions they truly need. Plus, we’ll tackle some common mistakes I’ve made myself. Understanding the basics can make a huge difference. Let’s get those winter bulbs thriving and bring some much-needed brightness to the colder months. Your garden deserves it!
We won’t cover every single bulb species out there. Our focus is on the general principles that apply to most winter-flowering bulbs. If you have a very specific plant you’re struggling with, you might need to consult specialized resources. But for most common issues, you’ll find the answers here. Let’s dig in!
Why Winter Bulbs Matter for Your Garden
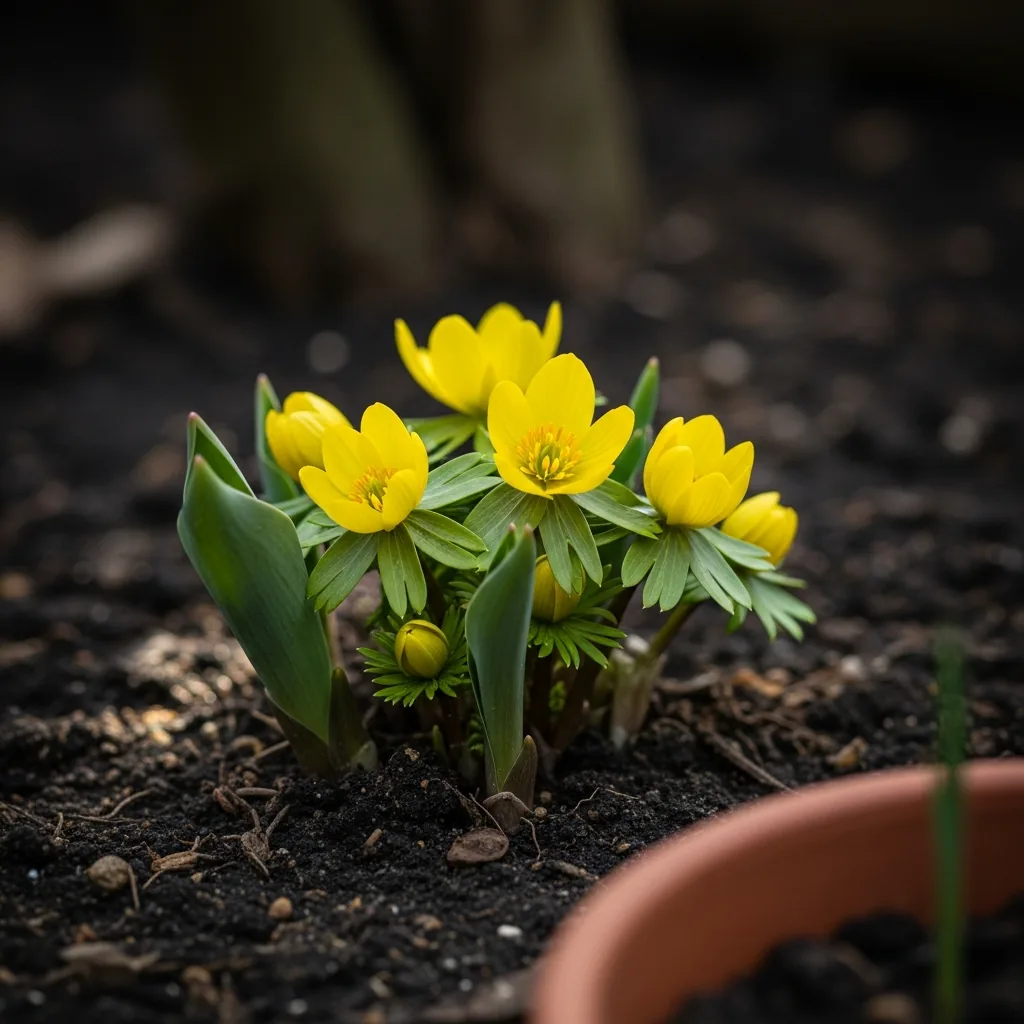
Honestly, who doesn’t want a little bit of cheer when the days get short and grey? Winter bulbs are like tiny miracles. They push up through cold soil, sometimes even snow, to give us that first splash of color. It’s a real mood booster after a long stretch of bare branches and muted tones. For us backyard gardeners, it means our outdoor spaces don’t have to feel completely dormant. Seeing a snowdrop or a winter aconite emerge is a promise that spring is indeed coming.
These hardy plants are often bred to withstand harsh conditions. They’re shows nature’s resilience. Planting them is an investment in future beauty. Plus, they can attract early pollinators, like bees, who are also waking up and looking for food. According to the USDA Natural Resources Conservation Service, even small patches of early-blooming flowers can provide crucial nectar sources for these vital insects [L1]. Providing these early food sources supports healthy ecosystems right in our own backyards.
Beyond the aesthetic and ecological benefits, growing winter bulbs is a rewarding gardening task. It teaches patience and observation. You learn to read the season and anticipate nature’s cycles. It’s a small act of hope planted in the ground. The effort you put in during the fall pays off with visual rewards during the winter gloom. It’s a simple way to extend your gardening season and enjoy your outdoor space longer.
When to Wait and When to Call an Expert
Worth watching:
- Bulbs are mushy or moldy: This usually means they got too wet or were stored improperly. Healthy bulbs should feel firm and dry. If they’re soft and smell bad, they’re likely a lost cause.
- No signs of growth by late winter/early spring: Give them a bit more time, especially if you had an unusually cold or wet fall. Some bulbs are just slow starters.
- Flowers are very small or deformed: This could be due to poor soil, lack of nutrients, or the bulbs being overcrowded. Sometimes, they just need a year or two to establish.
- Pests like slugs or rodents have eaten them: You might see chewed bulbs or tunnels in the soil. Protecting bulbs from critters is key before planting.
- Forced bulbs indoors bloom poorly or not at all: This often points to an issue with the chilling period. They might not have been kept cold enough or for long enough.
- Planting too late in the season: If you missed the fall planting window, it’s often too late for outdoor bulbs to establish roots before the ground freezes hard.
Worth calling an expert:
- Suspected toxicity to pets or children: Some bulbs, like daffodils and tulips, can be toxic if ingested. If you suspect a pet or child has eaten a bulb, contact the ASPCA Animal Poison Control Center immediately. They have extensive databases on plant toxicity [L2].
- Uncertainty about identifying a pest or disease: If you see unusual damage or a strange bug and can’t figure it out, your local cooperative extension office can help with plant and pest identification. They can offer region-specific advice.
- Large-scale planting or naturalizing issues: For extensive lawn plantings or if you’re unsure about the right conditions for naturalizing bulbs under trees, an expert from your local extension office can provide guidance on species and placement.
- Soil contamination concerns: If you’re planting in an area with a history of industrial use or you suspect lead or other contaminants, get a soil test. Your local cooperative extension office is the best place to start for soil testing services [L3].
- Significant rodent or animal damage: If you’ve tried basic deterrents and still have major issues with squirrels, voles, or deer destroying your bulbs, an extension agent can suggest more advanced or specific control methods for your area.
Step-by-Step Guide to Planting Winter Bulbs
- Choose the Right Bulbs: Select firm, healthy bulbs. Look for varieties specifically known for winter or early spring blooming. For indoor forcing, choose heat-treated bulbs. Avoid any that feel soft, have mold, or show signs of damage. Reputable sources are key. Many university extension sites offer lists of reliable varieties for your specific climate zone.
- Plant at the Correct Depth: This is super important! For most bulbs planted outdoors, aim for a depth of about 2 to 3 times the height of the bulb itself. The pointy end should face up. Planting too shallow can expose them to frost damage or make them easy pickings for critters. Planting too deep makes it hard for them to emerge. A general rule is to dig a hole about 4-6 inches deep for average-sized bulbs.
- Ensure Good Drainage: Most bulbs absolutely hate sitting in soggy soil. This can lead to rot. If your garden soil is heavy clay, amend it with compost or grit. Planting in raised beds or containers with good potting mix also helps ensure excellent drainage. Water them well after planting to settle the soil, but then let them be unless conditions are extremely dry.
- Provide Winter Chill (If Forcing Indoors): Many bulbs, especially those you want to bloom in winter indoors, require a period of cold dormancy. This is often 8-13 weeks below 45°F (7°C). You can achieve this in a refrigerator (not the one you use for food, as fruit emits ethylene gas that harms bulbs), a cool garage, or an unheated basement. Check resources from places like the University of Minnesota Extension for detailed indoor forcing guides [L4].
- Planting Time Matters: For outdoor bulbs, the best time to plant is in the fall, typically 6-8 weeks before the ground freezes solid. This allows their roots to establish. For indoor forcing, you’ll plant them about 8-13 weeks before you want them to bloom, following the chilling period. Don’t wait too long, or they won’t have enough time to develop properly.
- Mark Your Planting Spots: It’s easy to forget exactly where you planted those bulbs, especially if you have a large garden. Use plant markers, small stakes, or even brightly colored stones. This prevents you from accidentally digging them up in the spring while you’re busy with other garden tasks.
- Consider Succession Planting for Indoor Blooms: If you’re forcing bulbs like paperwhites or amaryllis indoors, plant a few every week or two. This staggered planting ensures a continuous display of flowers throughout the winter months, rather than having them all bloom at once and then finish.
Common Myths About Winter Bulbs
Myth: All bulbs planted in the fall will bloom in the spring.
Reality: While many spring-flowering bulbs do bloom in spring, specific winter-flowering varieties are bred for earlier blooms. Some bulbs also require a specific cold treatment (vernalization) to initiate flowering, which might not occur if planted too late or if winters are unusually mild. Forcing bulbs indoors requires replicating these conditions precisely, as outlined by Penn State Extension [L5].
Myth: You can plant winter bulbs anytime the ground isn’t frozen.
Reality: For bulbs intended to bloom outdoors, fall planting is crucial. They need time to establish roots before winter truly sets in. Planting too late means they may not survive the cold or will produce weak flowers. The Almanac suggests planting tulip bulbs in fall for spring blooms [L6].
Myth: All bulbs can be forced to bloom indoors easily.
Reality: Some bulbs, like paperwhite narcissus, are naturally easy to force and don’t even need soil (they grow on gravel and water). Others, such as tulips and hyacinths, require a significant chilling period (8-13 weeks) to mimic winter conditions. Amaryllis bulbs typically don’t need this extensive cold period if purchased ‘pre-chilled’ or heat-treated, but they still have specific light and water needs for indoor blooming [L7].
Myth: Once bulbs have bloomed, they’re done.
Reality: Many bulbs, especially hardy outdoor varieties, are perennial. After they finish flowering, let the foliage die back naturally. This allows the plant to store energy for the next season. With good care, bulbs like crocuses and snowdrops can naturalize and return year after year, often forming larger clumps over time.
Myth: You can’t grow bulbs in containers.
Reality: Containers are a fantastic way to grow bulbs, especially if you have poor garden soil or limited space. Ensure the container has drainage holes and use a good quality potting mix. For bulbs that need a cold period, you might need to bury the container in the ground for winter or move it to an unheated garage or shed to protect the roots from extreme cold and drying out.
What to Track for Winter Bulb Success
Keeping notes helps you learn what works best in your specific garden conditions. Here’s a checklist of things to observe:
- Bulb Appearance Before Planting: Note the size, firmness, and absence of mold or damage. Did they look healthy when you bought them?
- Planting Date: Record the exact date you planted your bulbs outdoors or indoors. This is crucial for understanding if timing was a factor.
- Planting Depth: Measure how deep you actually planted them. Was it consistent? Did you follow recommendations?
- Soil Moisture Levels: Observe if the soil stays consistently soggy or dries out too quickly after planting and during the growing season.
- Date of First Emergence: Note when you first see green shoots poking through the soil. Compare this to the expected timeline for that variety.
- Date of First Bloom: This is the exciting part! Record when the first flowers open. How does it compare to the variety’s typical bloom time?
- Flower Quality: Assess the size, color intensity, and number of blooms per stem. Are they strong or weak?
- Foliage Die-back: Observe when the green leaves start to yellow and wither after flowering. Let them die back naturally.
- Pest or Disease Sightings: Keep an eye out for any signs of slugs, snails, rodents, or unusual spots/discoloration on leaves or stems.
- Indoor Chilling Period: If forcing indoors, track the start and end dates of the chilling period and the temperature range if possible.
Frequently Asked Questions About Winter Bulbs
Can I plant bulbs in pots for winter blooms?
Yes, you absolutely can! Pots are great for winter bulbs, especially for forcing indoors or if your garden soil drains poorly. Use a quality potting mix and ensure the container has drainage holes. For bulbs that need a cold period, you might need to protect the pot from extreme freezing by burying it in the garden or storing it in an unheated garage.
How do I get my amaryllis to rebloom?
Getting amaryllis to rebloom takes a bit of effort. After it finishes flowering, cut the stalk back to about an inch above the bulb. Continue watering and fertilizing it through the spring and summer, keeping it in a sunny spot. In the fall, stop watering and let the soil dry out for about 8-10 weeks (a cool, dark place is ideal). Then, start watering again to encourage a new bloom stalk.
Are winter bulbs safe for my pets?
This is a really important question. Many common bulbs, including tulips, daffodils, and hyacinths, contain compounds that can be toxic to pets if ingested. The ASPCA provides a complete database of toxic and non-toxic plants for pets [L8]. Always check this resource before planting if you have curious cats or dogs. Consider planting toxic bulbs in areas inaccessible to pets or using containers.
Why aren’t my bulbs flowering even though they have leaves?
This can happen for several reasons. The bulb might not have received enough sunlight during its foliage stage last year to store enough energy. It could also lack essential nutrients, so a balanced fertilizer might help. Sometimes, bulbs need a period of vernalization (cold treatment), and if the winter wasn’t cold enough, they won’t flower. Also, overcrowding can lead to poor flowering; consider dividing the bulbs.
What’s the difference between planting bulbs outside and forcing them inside?
Planting outside relies on natural seasonal cues: fall planting for root establishment, and winter cold for dormancy and triggering blooms. Forcing bulbs inside involves manually replicating these conditions. You need to provide the correct chilling period for many species, plant them at the right time relative to desired bloom, and control their environment (light, temperature, water) to mimic natural growth cycles for winter displays.
Can I plant bulbs directly into my lawn?
Yes, some bulbs, like snowdrops and winter aconites, naturalize beautifully in lawns. Plant them in the fall while the soil is still workable. Choose a spot that doesn’t get mowed too early in the spring. Let the foliage die back completely before mowing to allow the bulb to store energy for next year. This is a lovely way to add surprise color. The Royal Horticultural Society offers advice on suitable plants for naturalizing [L9].
How deep should I plant flower bulbs in pots?
Generally, you plant bulbs in pots at the same depth as you would in the garden: about 2 to 3 times the height of the bulb. Place the bulb pointed-end up, and cover it with potting mix. Ensure there’s adequate space between bulbs, and that they aren’t touching the sides of the pot or each other too much. Good drainage is even more critical in containers.
Bringing Winter Blooms to Your Garden
It’s totally understandable to feel a little bummed when your anticipated winter blooms don’t show up. I’ve been there, staring at bare soil when I expected a splash of color. But remember, gardening is a learning process, and sometimes our plants just need a little extra guidance. By understanding the needs of your bulbs – from proper planting depth and drainage to ensuring they get enough chill time – you can significantly improve your chances of success.
Don’t get discouraged if your first attempt isn’t perfect. Keep observing, keep learning, and don’t hesitate to reach out for help. If you’re dealing with persistent issues, potential toxicity, or uncertainty about pests and diseases, remember that your local cooperative extension office or the ASPCA are invaluable resources. They’re there to help you succeed, just like I am!